Wallets

·

July 2, 2024

MetaMask crypto wallet

Jonatan Blum

MetaMask wallet is still the most used wallet in Web3 with a long-established legacy, but how do you set up and use Metamask and what are some alternative crypto wallets to consider? 

MetaMask entered the crypto scene in 2016 and soon became the favorite wallet of Ethereum users and developers. It was one of the pioneering browser-based wallets that made blockchain interactions easier for ordinary people. 

Nevertheless, a lot has changed in the crypto world since MetaMask emerged. Although it remains well-known and the most widely-used wallet within this industry, newer wallets have captured a significant share of the market with new features and a smoother user experience. 

Just need a wallet? Set up Coinbase Smart Wallet in under 10 seconds!

In this blog, we explore MetaMask's background, how to use it, and compare MetaMask with some alternative crypto wallets!

What is MetaMask?

MetaMask is a self-custodial crypto wallet that has become a core component of the Ethereum system. It was developed by ConsenSys, a big and trusted Web3 company that is behind much innovation in the space. 

Part of what makes MetaMask popular is its adaptability, as it enables users to connect with many different Ethereum-based networks and incorporate custom RPCs to interact with other compatible blockchains. 

The MetaMask browser extension is what made the wallet famous. Becoming a core part of everyday users' browsers, whether on Chrome, Firefox, or Brave, allowed early users to manage and exchange tokens, and sign transactions in one place. More recently, MetaMask Portfolio was developed to let users visualize all their digital assets across numerous accounts and networks in their browser.

While the browser extension is the most popular, a MetaMask app on iOS and Android mobile has also grown popular since launching in 2019. Whether using the mobile crypto wallet app or browser extension, MetaMask’s combination of flexibility and openness is part of what has made it a leading wallet in the space.

How to set up a MetaMask wallet

While MetaMask was once one of the only crypto wallet extensions available for beginners and experts alike, it is more complex to set up and use than other wallets available today, such as Coinbase smart Wallet. 

To help you get started, here is a step-by-step guide to set up MetaMask. 

  1. Download the MetaMask extension from Chrome’s browser extension store.
  2. Set a password and save it in a safe place, ideally written down physically or using a secure password manager.
    Your MetaMask password protects your assets from other people who might use your computer. If you lose your password, you can still recover your assets using your seed phrase, which we’ll cover in the next step.
  1. Reveal your Secret Recovery phrase and write it down in order on paper. This is a list of 12 words in a specific order.
12 word secret recovery phrase
Do not store your seed phrase on a computer.

Your seed phrase is a backup of your MetaMask wallet and is used to recover all your keys and crypto assets in an emergency. If you lose your seed and can’t access the app or extension, you will permanently lose access to your crypto. Here are some best practices for storing seed phrases:

  • Make a physical copy of the secret phrase and store it in a secure location that only you can access. Anyone who has the seed can use it to access your wallet.
  • Never save your seed on your computer or in a cloud service, because a data breach or malware could lead to the total loss of your assets.
    While MetaMask is secure enough for everyday trades, it shouldn’t be the main place you store your crypto. For long-term security, it is better to use an offline device such as a hardware wallet. These can also be connected to MetaMask for app compatibility.
  1. Congratulations! Now you have your seed safely stored offline, you have completed setting up your MetaMask wallet. 

👉This is a great moment to test your seed phrase, before you add any funds to your wallet. Using the seed you wrote down on paper, try and set up the MetaMask mobile app by importing the seed. If the imported wallet has the exact same address, you created the back up successfully. 

How to use MetaMask with a hardware wallet

Browser extensions and mobile apps like MetaMask are not secure enough to use as your main wallet for long-term storage of crypto assets. They are best used for smaller amounts which you are actively trading or using. For long-term security, use a hardware wallet.

Hardware wallets are a better way to secure your crypto savings as they generate and store your seed phrase completely offline so there is no way to extract it over the internet. For security and convenience, you can set up a MetaMask account that connects to your hardware wallet, so your seed remains offline but you can still interact with your favorite apps. 

Note that it is still recommended to use a separate address on your hardware wallet for MetaMask as interacting with smart contracts can introduce other attack vectors that allow your funds to be drained.

Here is a step-by-step guide on connecting a Ledger, Trezor or Lattice to MetaMask. 

  1. Open MetaMask, click the account icon, and select "Add Hardware Wallet."
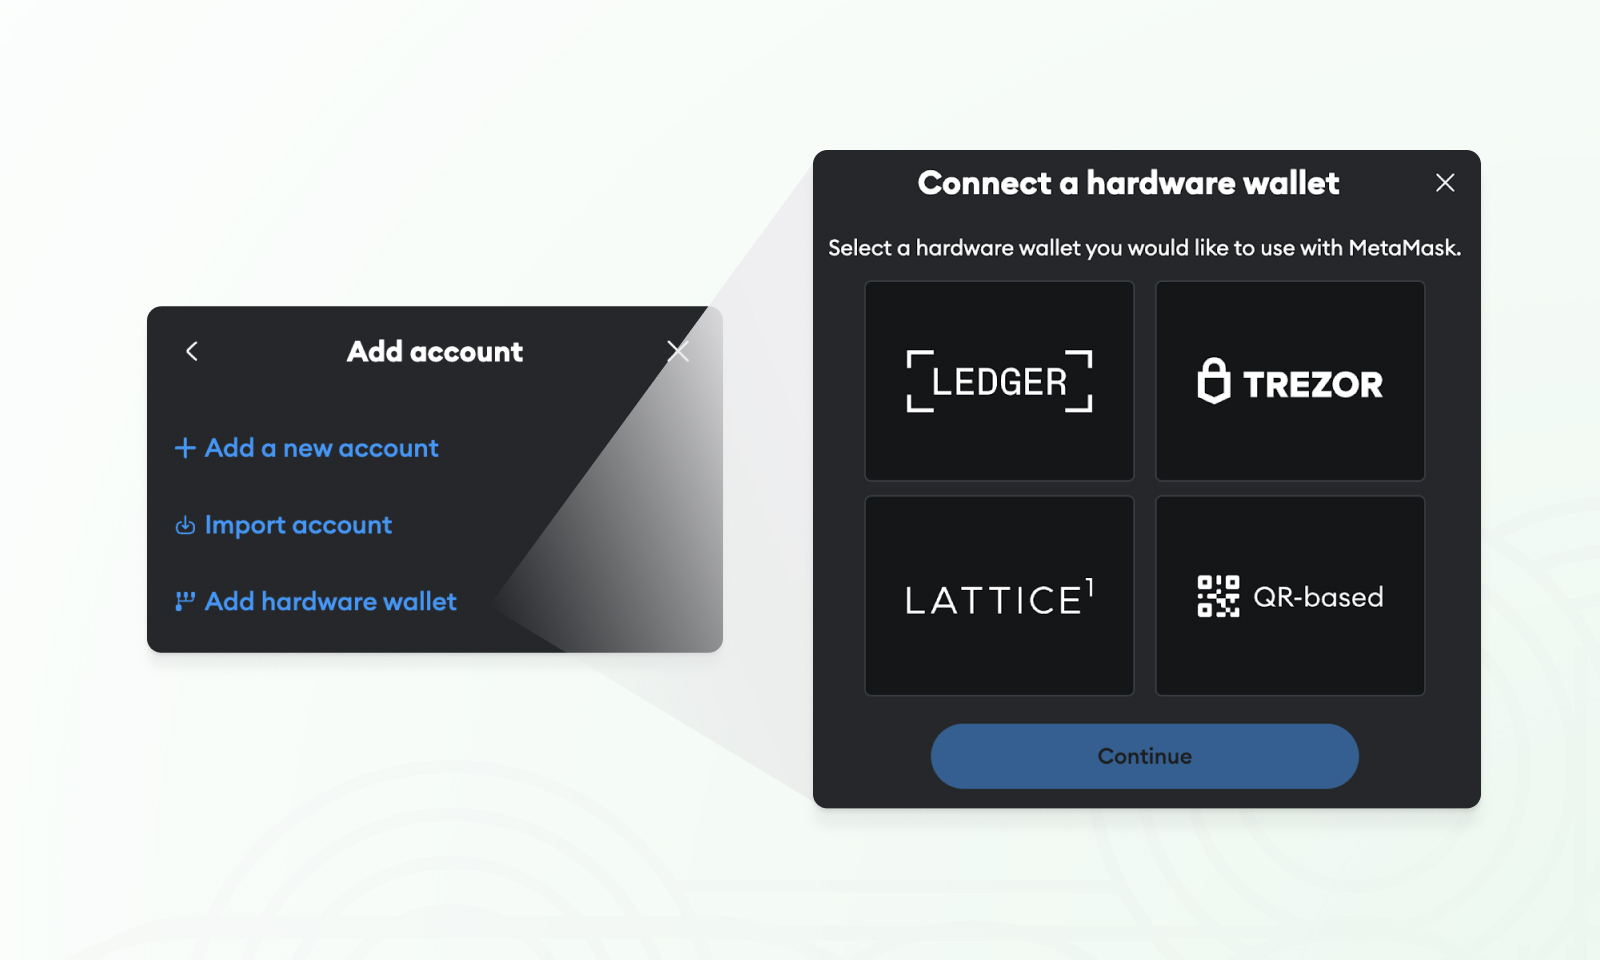
Connect a hardware wallet to metamask
  1. Select your hardware wallet
    Choose the brand of wallet you have, Ledger, Trezor and Lattice are natively supported.
  1. Follow the onscreen Instructions and prompts to connect and unlock your hardware wallet.
    Once finished, you will be able to view assets on your hardware wallet even if the device is disconnected. To sign and verify transactions and other data, you will need to connect your hardware wallet.

How to add new chains to MetaMask?

MetaMask is highly configurable but only supports Ethereum by default. To add new chains to MetaMask, you will need to enable them from a list of presets, or add the network parameters manually. Here’s how to add a blockchain to MetaMask:  

  1. Open MetaMask, click on the network dropdown at the top, and select Add Network.
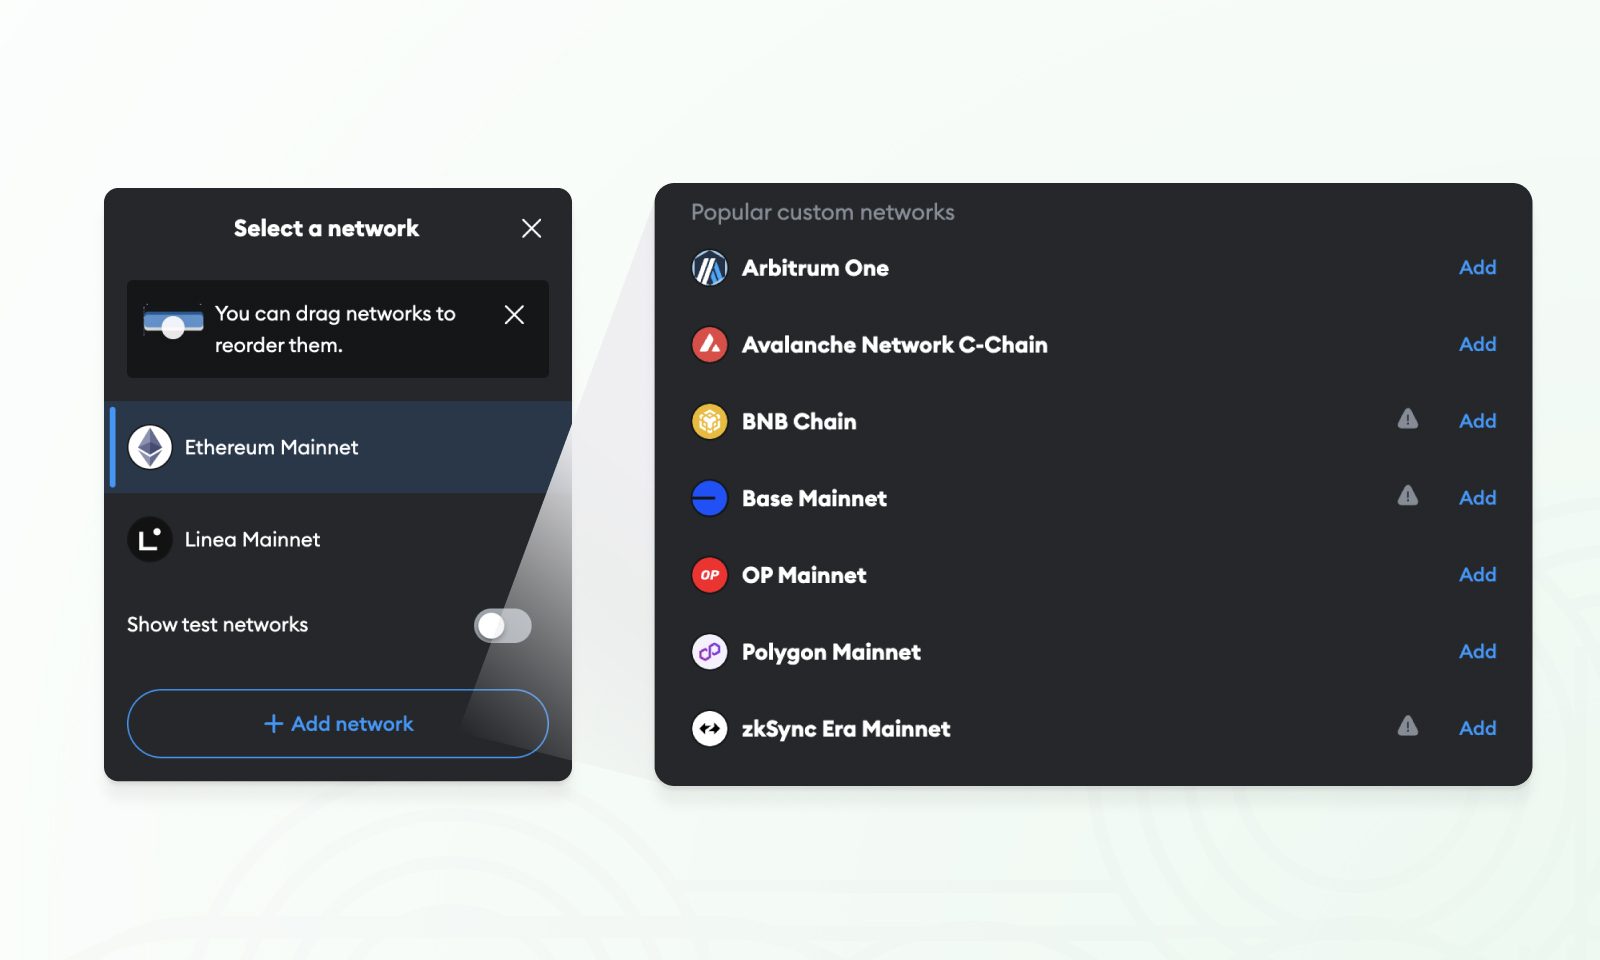
Add a chain to metamask from a list of presets
  1. Now, choose from the list of networks available and click Add.

    If the network you want is not available, you can add them manually:
  1. Click “Add a network manually” and fill in the details.
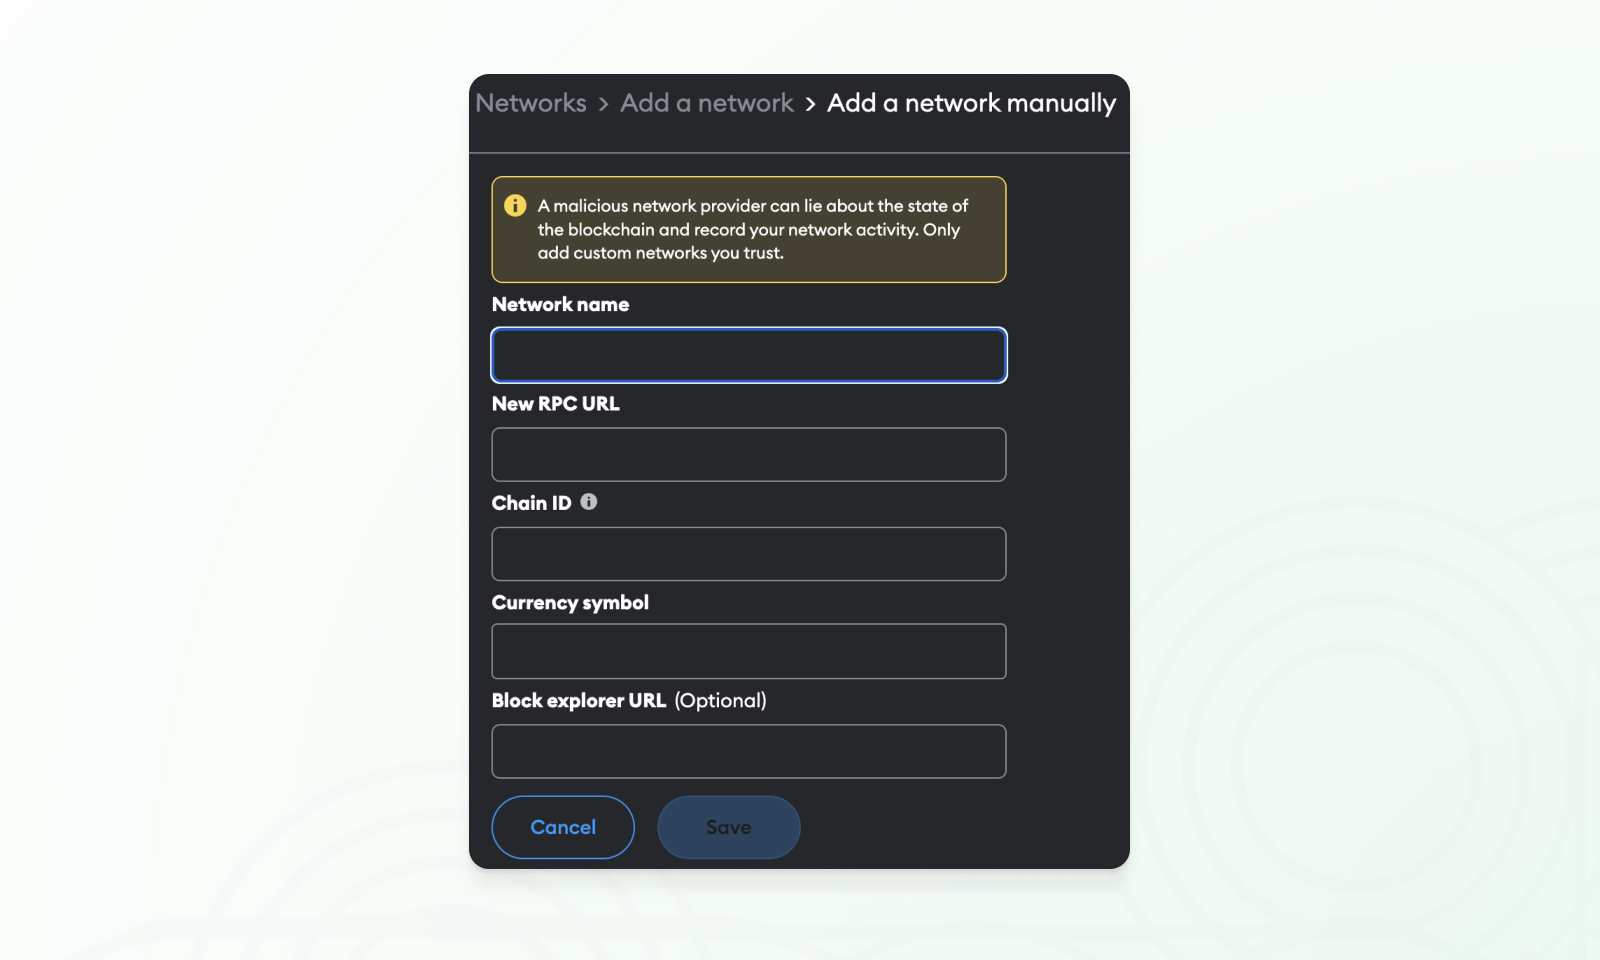
Adding a chain to metamask manually

Copy these details from credible sources and cross-verify them to be safe. Below is a table showing the network details for each chain supported by Matcha. 

Table of RPC settings for Matcha chains

Matcha supports nine blockchain networks. Here is a table of the RPC settings for Matcha-supported chains:

Network Name RPC URL Chain ID Currency Symbol Block explorer URL
Polygon https://polygon-rpc.com/ 137 MATIC https://polygonscan.com/
Arbitrum One https://arb1.arbitrum.io/rpc 42161 ETH https://arbiscan.io
Base https://mainnet.base.org 8453 ETH https://basescan.org
Optimism https://mainnet.optimism.io/ 10 ETH https://optimistic.etherscan.io
BNB Smart Chain https://bsc-dataseed.binance.org/ 56 BNB https://bscscan.com
Avalanche https://api.avax.network/ext/bc/C/rpc 43114 AVAX https://snowtrace.io
Fantom Opera https://rpc.ankr.com/fantom/ 250 FTM https://ftmscan.com
Celo Mainnet https://forno.celo.org 42220 CELO https://explorer.celo.org

How to trade on Matcha using MetaMask

Once your MetaMask wallet is set up, you can trade cryptocurrencies, buy ETH or other coins, and start trading on Matcha. The most popular network available on MetaMask is Ethereum, and you can acquire ETH by pressing Buy and using one of MetaMask’s fiat onramps, or simply depositing crypto from an exchange to the wallet address shown at the top of your MetaMask wallet. 

Once you have added some assets to MetaMask, preferably the native token used for gas for a specific chain, you are ready to start trading. Note that with Matcha Auto enabled, you can trade any asset even if you don’t have native tokens for gas. 
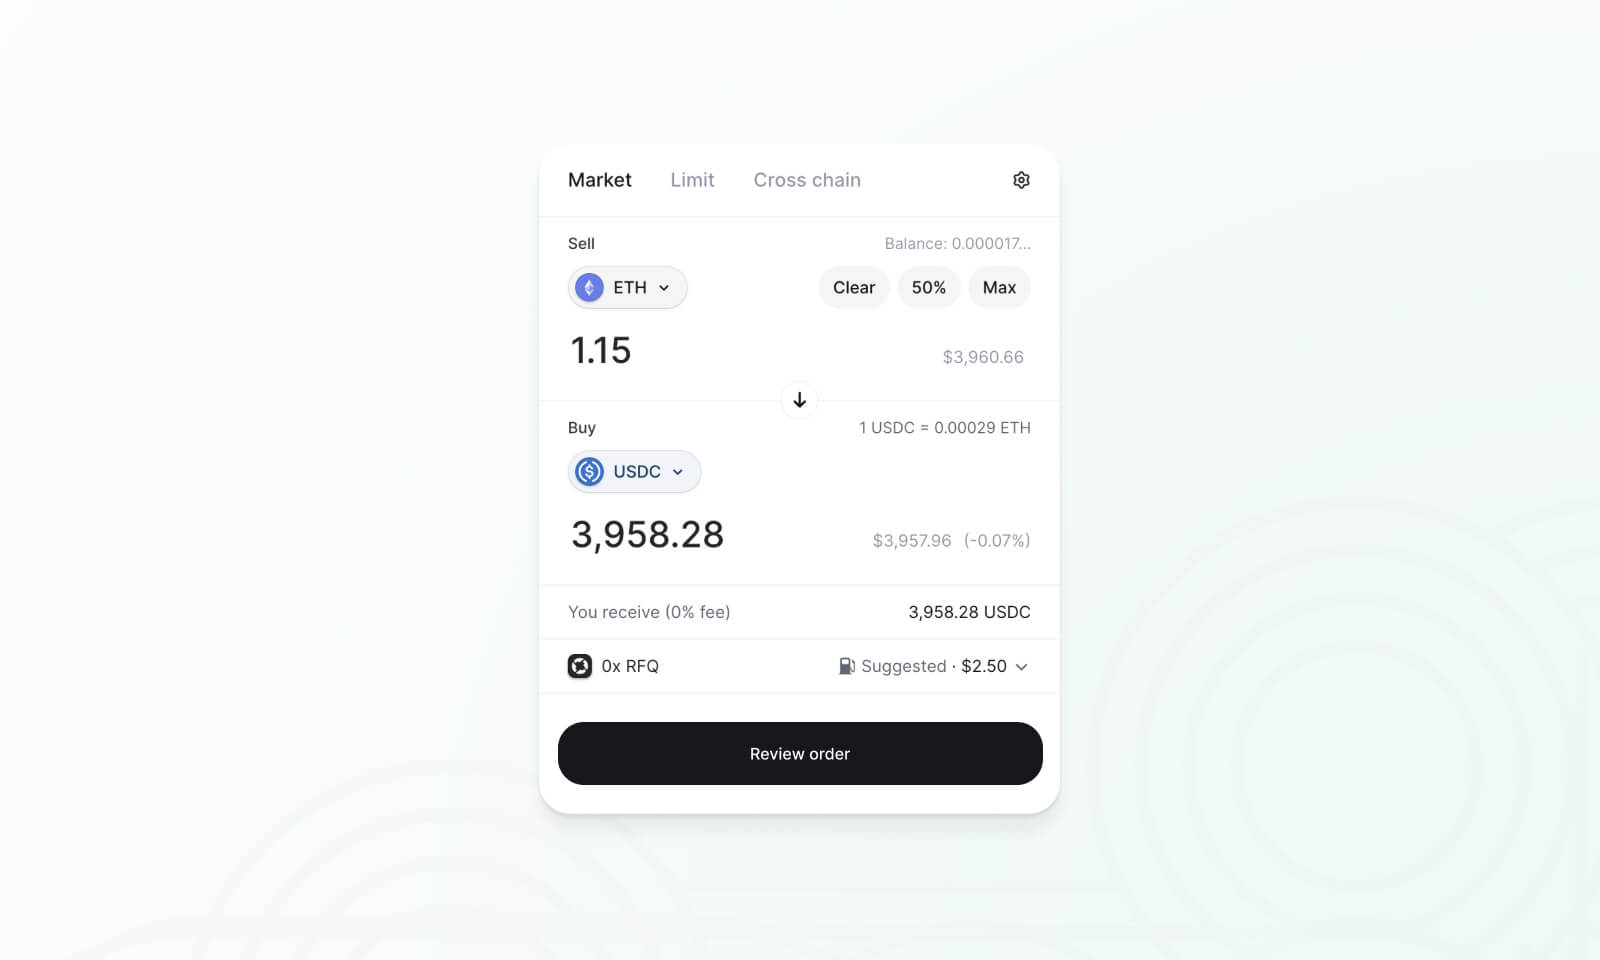
Trading ETH for USDC on Matcha
Swaps on Matcha are free, you only pay network fees.
  1. Go to matcha.xyz and click Connect. Select MetaMask from the pop-up menu and MetaMask will open.
  2. You will need to sign a message in your MetaMask wallet to complete the connection.
  3. Use the search bar to find the token you want to sell and then choose the token you want to receive.
  4. Set how much you want to sell or how much to buy using the trade module. You can also change the dollar field to sell a specific USD amount.
  5. Confirm the trade. The first time your trade, you will be asked to approve spending the token beforehand, in which case you will need to approve and then confirm.
    Review the order on Matcha, hit confirm in MetaMask, and wait for the transaction to be processed. That’s your first Matcha swap transaction!

For more control over your trades, you can click on the settings icon in the top-right. You will see that Matcha offers two trade modes: Matcha Auto or Custom settings. Matcha Auto will take care of all the settings and get you the most favorable trade, without needing gas and protecting you from MEV, making it the easiest option. Custom allows you to manually set up your trade to have more control over parameters like network fees, slippage, and liquidity sources, and lets you trade without added fees.

Buy and sell crypto on MetaMask

Apart from trading on Matcha using MetaMask, MetaMask itself offers users the ability to trade with its swap function, among other features. While this can be convenient, you should be aware that the fees to buy, sell or swap on MetaMask are often much higher than other options. For example, swaps on Matcha are free while MetaMask charges almost 1% of the traded amount! Here’s a list of actions you can perform in MetaMask:

  • Buy crypto on MetaMask: You can purchase Ethereum (ETH) or other supported cryptocurrencies directly within the MetaMask wallet for fiat currency such as dollars or euros. Pick and choose the currency you want to buy cryptocurrency with, and also choose the payment provider based on credibility. MetaMask supports various payment methods, countries and currencies through its third-party providers, and will redirect you to their platform to finalize the process. Be aware that each provider may charge additional fees and require identity verification to complete the process.
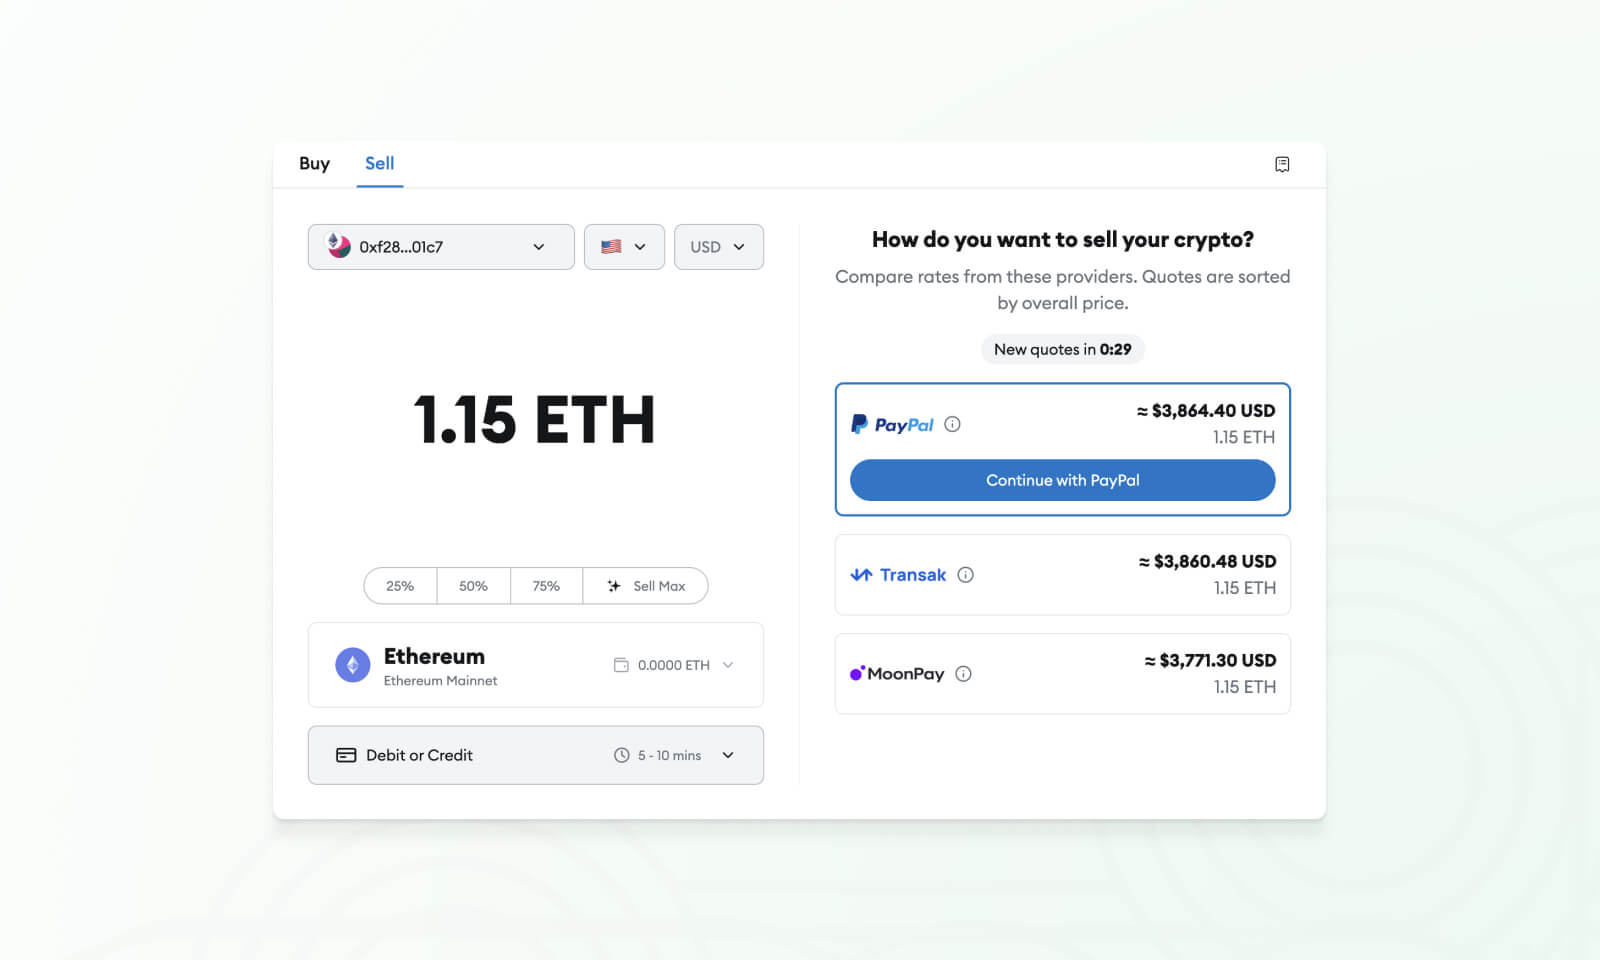
Sell crypto for fiat money on Metamask using a third-party provider
MetaMask compares Buy and Sell offers from third-party providers.
  • Sell crypto on MetaMask: You can also sell your crypto directly for fiat to get your money out of MetaMask and back to your bank account. MetaMask will compare rates from third party providers and then redirect you to your offramp of choice, where you will need to register. Be wary that fees can be quite high, so it is best to sell crypto in one larger transaction rather than smaller batches.
  • Send crypto from MetaMask: You can transfer your crypto to another wallet address by selecting the Send feature. To do so, enter the recipient’s address and the amount you want to send, then confirm by signing the transaction. Note that gas must be set high enough for the transaction to be successful.  
  • Swap tokens: MetaMask allows token swaps, exchanging one cryptocurrency for another, though it charges a 0.875% fee. At Matcha, we charge 0% fees for the same service, or just 0.25% with added protections and gasless functionality.
  • Bridging: MetaMask supports bridging tokens across different networks which lets you trade assets from one chain to another. MetaMask bridge fees are 0.875% while Matcha cross chain swaps directly from one token to another have 0% bridge fees. 

What are MetaMask Snaps?

MetaMask’s functionality is currently limited to these four actions, and it lacks several features of newer wallets which makes it quite difficult to use. MetaMask Snaps are a way to add new features to your MetaMask to enhance security, account management, interoperability, and more. 

Developers can create their own Snaps and add them to MetaMask to make it work better with various apps. Users can choose which Snaps to enable to customize their wallet experience according to their needs.

Since the launch of Snaps in 2023, over 55 Snaps have been made available to users by third-party developers. There have been around 900,000 installs across all Snaps. One example of how a Snap can improve your DeFi wallet experience is to add a risk monitor Snap that will alert you to any suspicious smart contracts and let you better avoid wallet drainers. 

MetaMask is a versatile wallet that maintains its popularity today despite its somewhat clunky UX. MetaMask Snaps and Portfolio are two recent features that have upgraded its offerings to be more in line with trendier wallets, though the overall user experience is still lacking. 

If MetaMask seems too overwhelming for you, there are many other wallets in the space that you might want to check out. 

Alternative crypto wallets

There are many wallets available and not all are supported by the DeFi exchanges and apps which you might use. MetaMask is still the most widely-supported wallet, but tools like WalletConnect and built-in MetaMask compatibility of some wallets have made the space much more flexible. 
Best crypto wallets for defi
Read more about crypto wallets.

If you’re new to crypto and just want a wallet you can set up and use straight away, you can create a new Coinbase Smart Wallet directly on Matcha by selecting Create Wallet from any page.

Below are a few of the many other DeFi wallets which you can use almost anywhere, with a more comprehensive feature set than MetaMask. They support most if not all of the chains available on Matcha, and include game-changing features such as smart contract risk notifications and the ability to revoke transaction allowances. 

Rainbow

Rainbow is another Web3 wallet browser extension and mobile app known for its fun and intuitive interface, making crypto accessible to beginners. It gained popularity for its UX and in-built points and leaderboard system. 

  • Feature highlight: Rainbow’s Watch mode allows users to follow other’s wallet activity, holdings, and transactions.

Zerion

Zerion is a browser app and mobile extension popular for its comprehensive DeFi portfolio management capabilities. The team behind it has also announced plans to make their own chain. 

  • Feature highlight: Zerion’s all-in-one DeFi Dashboard which presents a comprehensive view of your portfolio, including investments, loans, and yield farming. 

Coinbase Wallet

Coinbase Wallet builds on Coinbase’s reputation for security and ease of use, and it is widely used thanks to its seamless integration with Coinbase exchange and good compatibility with DeFi apps.

  • Feature highlight: Coinbase integration for easy top-ups and trading. Coinbase Wallet also lets you send USDC as a text message to onboard friends, and allows for completely fee-free withdrawals in USDC. 

Which crypto wallet is best?

MetaMask is a powerful tool, but it was created during an earlier era of Web3, when use cases were nowhere near as established as they are today, meaning a lot of new features have been added on top rather than feeling like part of the whole.

Modern wallets have leapfrogged MetaMask in terms of usability, as they were built at a time when the key needs for wallets have already been defined. Depending on your needs, you may be more comfortable with an alternative that ‘just works’ with your favorite DEX

All set up? Trade crypto on Matcha!

For a more complete overview of the various wallets and their specific feature sets, read our guide to DeFi wallets, which will help you find a wallet that suits you best. Whatever wallet you choose, you can connect to Matcha for fee-free trading and cross chain swaps, with the best prices in crypto

Contents
Subscribe to our newsletter
By submitting you're confirming that you agree with our Terms and Conditions.
Yay! You’re signed up.
Oops! Something went wrong, but it's not your fault.
Wallets

·

July 2, 2024

MetaMask crypto wallet

How to set up and use metamask wallet

MetaMask wallet is still the most used wallet in Web3 with a long-established legacy, but how do you set up and use Metamask and what are some alternative crypto wallets to consider? 

MetaMask entered the crypto scene in 2016 and soon became the favorite wallet of Ethereum users and developers. It was one of the pioneering browser-based wallets that made blockchain interactions easier for ordinary people. 

Nevertheless, a lot has changed in the crypto world since MetaMask emerged. Although it remains well-known and the most widely-used wallet within this industry, newer wallets have captured a significant share of the market with new features and a smoother user experience. 

Just need a wallet? Set up Coinbase Smart Wallet in under 10 seconds!

In this blog, we explore MetaMask's background, how to use it, and compare MetaMask with some alternative crypto wallets!

What is MetaMask?

MetaMask is a self-custodial crypto wallet that has become a core component of the Ethereum system. It was developed by ConsenSys, a big and trusted Web3 company that is behind much innovation in the space. 

Part of what makes MetaMask popular is its adaptability, as it enables users to connect with many different Ethereum-based networks and incorporate custom RPCs to interact with other compatible blockchains. 

The MetaMask browser extension is what made the wallet famous. Becoming a core part of everyday users' browsers, whether on Chrome, Firefox, or Brave, allowed early users to manage and exchange tokens, and sign transactions in one place. More recently, MetaMask Portfolio was developed to let users visualize all their digital assets across numerous accounts and networks in their browser.

While the browser extension is the most popular, a MetaMask app on iOS and Android mobile has also grown popular since launching in 2019. Whether using the mobile crypto wallet app or browser extension, MetaMask’s combination of flexibility and openness is part of what has made it a leading wallet in the space.

How to set up a MetaMask wallet

While MetaMask was once one of the only crypto wallet extensions available for beginners and experts alike, it is more complex to set up and use than other wallets available today, such as Coinbase smart Wallet. 

To help you get started, here is a step-by-step guide to set up MetaMask. 

  1. Download the MetaMask extension from Chrome’s browser extension store.
  2. Set a password and save it in a safe place, ideally written down physically or using a secure password manager.
    Your MetaMask password protects your assets from other people who might use your computer. If you lose your password, you can still recover your assets using your seed phrase, which we’ll cover in the next step.
  1. Reveal your Secret Recovery phrase and write it down in order on paper. This is a list of 12 words in a specific order.
12 word secret recovery phrase
Do not store your seed phrase on a computer.

Your seed phrase is a backup of your MetaMask wallet and is used to recover all your keys and crypto assets in an emergency. If you lose your seed and can’t access the app or extension, you will permanently lose access to your crypto. Here are some best practices for storing seed phrases:

  • Make a physical copy of the secret phrase and store it in a secure location that only you can access. Anyone who has the seed can use it to access your wallet.
  • Never save your seed on your computer or in a cloud service, because a data breach or malware could lead to the total loss of your assets.
    While MetaMask is secure enough for everyday trades, it shouldn’t be the main place you store your crypto. For long-term security, it is better to use an offline device such as a hardware wallet. These can also be connected to MetaMask for app compatibility.
  1. Congratulations! Now you have your seed safely stored offline, you have completed setting up your MetaMask wallet. 

👉This is a great moment to test your seed phrase, before you add any funds to your wallet. Using the seed you wrote down on paper, try and set up the MetaMask mobile app by importing the seed. If the imported wallet has the exact same address, you created the back up successfully. 

How to use MetaMask with a hardware wallet

Browser extensions and mobile apps like MetaMask are not secure enough to use as your main wallet for long-term storage of crypto assets. They are best used for smaller amounts which you are actively trading or using. For long-term security, use a hardware wallet.

Hardware wallets are a better way to secure your crypto savings as they generate and store your seed phrase completely offline so there is no way to extract it over the internet. For security and convenience, you can set up a MetaMask account that connects to your hardware wallet, so your seed remains offline but you can still interact with your favorite apps. 

Note that it is still recommended to use a separate address on your hardware wallet for MetaMask as interacting with smart contracts can introduce other attack vectors that allow your funds to be drained.

Here is a step-by-step guide on connecting a Ledger, Trezor or Lattice to MetaMask. 

  1. Open MetaMask, click the account icon, and select "Add Hardware Wallet."
Connect a hardware wallet to metamask
  1. Select your hardware wallet
    Choose the brand of wallet you have, Ledger, Trezor and Lattice are natively supported.
  1. Follow the onscreen Instructions and prompts to connect and unlock your hardware wallet.
    Once finished, you will be able to view assets on your hardware wallet even if the device is disconnected. To sign and verify transactions and other data, you will need to connect your hardware wallet.

How to add new chains to MetaMask?

MetaMask is highly configurable but only supports Ethereum by default. To add new chains to MetaMask, you will need to enable them from a list of presets, or add the network parameters manually. Here’s how to add a blockchain to MetaMask:  

  1. Open MetaMask, click on the network dropdown at the top, and select Add Network.
Add a chain to metamask from a list of presets
  1. Now, choose from the list of networks available and click Add.

    If the network you want is not available, you can add them manually:
  1. Click “Add a network manually” and fill in the details.
Adding a chain to metamask manually

Copy these details from credible sources and cross-verify them to be safe. Below is a table showing the network details for each chain supported by Matcha. 

Table of RPC settings for Matcha chains

Matcha supports nine blockchain networks. Here is a table of the RPC settings for Matcha-supported chains:

Network Name RPC URL Chain ID Currency Symbol Block explorer URL
Polygon https://polygon-rpc.com/ 137 MATIC https://polygonscan.com/
Arbitrum One https://arb1.arbitrum.io/rpc 42161 ETH https://arbiscan.io
Base https://mainnet.base.org 8453 ETH https://basescan.org
Optimism https://mainnet.optimism.io/ 10 ETH https://optimistic.etherscan.io
BNB Smart Chain https://bsc-dataseed.binance.org/ 56 BNB https://bscscan.com
Avalanche https://api.avax.network/ext/bc/C/rpc 43114 AVAX https://snowtrace.io
Fantom Opera https://rpc.ankr.com/fantom/ 250 FTM https://ftmscan.com
Celo Mainnet https://forno.celo.org 42220 CELO https://explorer.celo.org

How to trade on Matcha using MetaMask

Once your MetaMask wallet is set up, you can trade cryptocurrencies, buy ETH or other coins, and start trading on Matcha. The most popular network available on MetaMask is Ethereum, and you can acquire ETH by pressing Buy and using one of MetaMask’s fiat onramps, or simply depositing crypto from an exchange to the wallet address shown at the top of your MetaMask wallet. 

Once you have added some assets to MetaMask, preferably the native token used for gas for a specific chain, you are ready to start trading. Note that with Matcha Auto enabled, you can trade any asset even if you don’t have native tokens for gas. 

Trading ETH for USDC on Matcha
Swaps on Matcha are free, you only pay network fees.
  1. Go to matcha.xyz and click Connect. Select MetaMask from the pop-up menu and MetaMask will open.
  2. You will need to sign a message in your MetaMask wallet to complete the connection.
  3. Use the search bar to find the token you want to sell and then choose the token you want to receive.
  4. Set how much you want to sell or how much to buy using the trade module. You can also change the dollar field to sell a specific USD amount.
  5. Confirm the trade. The first time your trade, you will be asked to approve spending the token beforehand, in which case you will need to approve and then confirm.
    Review the order on Matcha, hit confirm in MetaMask, and wait for the transaction to be processed. That’s your first Matcha swap transaction!

For more control over your trades, you can click on the settings icon in the top-right. You will see that Matcha offers two trade modes: Matcha Auto or Custom settings. Matcha Auto will take care of all the settings and get you the most favorable trade, without needing gas and protecting you from MEV, making it the easiest option. Custom allows you to manually set up your trade to have more control over parameters like network fees, slippage, and liquidity sources, and lets you trade without added fees.

Buy and sell crypto on MetaMask

Apart from trading on Matcha using MetaMask, MetaMask itself offers users the ability to trade with its swap function, among other features. While this can be convenient, you should be aware that the fees to buy, sell or swap on MetaMask are often much higher than other options. For example, swaps on Matcha are free while MetaMask charges almost 1% of the traded amount! Here’s a list of actions you can perform in MetaMask:

  • Buy crypto on MetaMask: You can purchase Ethereum (ETH) or other supported cryptocurrencies directly within the MetaMask wallet for fiat currency such as dollars or euros. Pick and choose the currency you want to buy cryptocurrency with, and also choose the payment provider based on credibility. MetaMask supports various payment methods, countries and currencies through its third-party providers, and will redirect you to their platform to finalize the process. Be aware that each provider may charge additional fees and require identity verification to complete the process.
Sell crypto for fiat money on Metamask using a third-party provider
MetaMask compares Buy and Sell offers from third-party providers.
  • Sell crypto on MetaMask: You can also sell your crypto directly for fiat to get your money out of MetaMask and back to your bank account. MetaMask will compare rates from third party providers and then redirect you to your offramp of choice, where you will need to register. Be wary that fees can be quite high, so it is best to sell crypto in one larger transaction rather than smaller batches.
  • Send crypto from MetaMask: You can transfer your crypto to another wallet address by selecting the Send feature. To do so, enter the recipient’s address and the amount you want to send, then confirm by signing the transaction. Note that gas must be set high enough for the transaction to be successful.  
  • Swap tokens: MetaMask allows token swaps, exchanging one cryptocurrency for another, though it charges a 0.875% fee. At Matcha, we charge 0% fees for the same service, or just 0.25% with added protections and gasless functionality.
  • Bridging: MetaMask supports bridging tokens across different networks which lets you trade assets from one chain to another. MetaMask bridge fees are 0.875% while Matcha cross chain swaps directly from one token to another have 0% bridge fees. 

What are MetaMask Snaps?

MetaMask’s functionality is currently limited to these four actions, and it lacks several features of newer wallets which makes it quite difficult to use. MetaMask Snaps are a way to add new features to your MetaMask to enhance security, account management, interoperability, and more. 

Developers can create their own Snaps and add them to MetaMask to make it work better with various apps. Users can choose which Snaps to enable to customize their wallet experience according to their needs.

Since the launch of Snaps in 2023, over 55 Snaps have been made available to users by third-party developers. There have been around 900,000 installs across all Snaps. One example of how a Snap can improve your DeFi wallet experience is to add a risk monitor Snap that will alert you to any suspicious smart contracts and let you better avoid wallet drainers. 

MetaMask is a versatile wallet that maintains its popularity today despite its somewhat clunky UX. MetaMask Snaps and Portfolio are two recent features that have upgraded its offerings to be more in line with trendier wallets, though the overall user experience is still lacking. 

If MetaMask seems too overwhelming for you, there are many other wallets in the space that you might want to check out. 

Alternative crypto wallets

There are many wallets available and not all are supported by the DeFi exchanges and apps which you might use. MetaMask is still the most widely-supported wallet, but tools like WalletConnect and built-in MetaMask compatibility of some wallets have made the space much more flexible. 

Best crypto wallets for defi
Read more about crypto wallets.

If you’re new to crypto and just want a wallet you can set up and use straight away, you can create a new Coinbase Smart Wallet directly on Matcha by selecting Create Wallet from any page.

Below are a few of the many other DeFi wallets which you can use almost anywhere, with a more comprehensive feature set than MetaMask. They support most if not all of the chains available on Matcha, and include game-changing features such as smart contract risk notifications and the ability to revoke transaction allowances. 

Rainbow

Rainbow is another Web3 wallet browser extension and mobile app known for its fun and intuitive interface, making crypto accessible to beginners. It gained popularity for its UX and in-built points and leaderboard system. 

  • Feature highlight: Rainbow’s Watch mode allows users to follow other’s wallet activity, holdings, and transactions.

Zerion

Zerion is a browser app and mobile extension popular for its comprehensive DeFi portfolio management capabilities. The team behind it has also announced plans to make their own chain. 

  • Feature highlight: Zerion’s all-in-one DeFi Dashboard which presents a comprehensive view of your portfolio, including investments, loans, and yield farming. 

Coinbase Wallet

Coinbase Wallet builds on Coinbase’s reputation for security and ease of use, and it is widely used thanks to its seamless integration with Coinbase exchange and good compatibility with DeFi apps.

  • Feature highlight: Coinbase integration for easy top-ups and trading. Coinbase Wallet also lets you send USDC as a text message to onboard friends, and allows for completely fee-free withdrawals in USDC. 

Which crypto wallet is best?

MetaMask is a powerful tool, but it was created during an earlier era of Web3, when use cases were nowhere near as established as they are today, meaning a lot of new features have been added on top rather than feeling like part of the whole.

Modern wallets have leapfrogged MetaMask in terms of usability, as they were built at a time when the key needs for wallets have already been defined. Depending on your needs, you may be more comfortable with an alternative that ‘just works’ with your favorite DEX

All set up? Trade crypto on Matcha!

For a more complete overview of the various wallets and their specific feature sets, read our guide to DeFi wallets, which will help you find a wallet that suits you best. Whatever wallet you choose, you can connect to Matcha for fee-free trading and cross chain swaps, with the best prices in crypto

Subscribe for an instantly better inbox

By submitting you're confirming that you agree with our Terms and Conditions.
Yay! You’re signed up.
Oops! Something went wrong while submitting the form.